Epilog - Adjusting Table Level for the Mini and Helix
Ensuring a perfectly level table is not just a step, but a crucial prerequisite for any cutting or engraving project. In this guide, we'll walk you through the process of checking your table level and making adjustments as necessary.
Checking the Table Level
- With your machine on, open the top door so you can have full access to the table.
- Disable the X and Y-axis motors so you can manually move the carriage over the entire table. To do this, press the X/Y OFF button and then press the GO button.
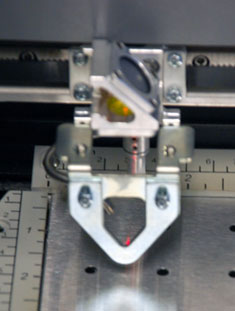
- Locate the manual focus gauge. A triangular or “V” shaped tool is shown to the right.
- Place the gauge on the lens carriage as if you are going to focus the machine manually.
- Adjust the table until it makes contact with the very bottom tip of the focus gauge. This will help you determine the table's level.
- Move the lens carriage to all four corners to visually inspect the distance between the focus gauge and the table.
- If the gauge moves up or the spacing between it and the table increases, this indicates that the table is not level and will need to be adjusted.

How to Level the Table
- Locate the set of lock and adjustment screws that are on the outside edge of the flip-up rulers (near each corner of the engraving table). Notice that for each set of screws, there is one screw with a lock washer and one without. The screw without the lock washer is used to adjust that corner of the table up or down (the adjustment screw). The screw with the lock washer locks the table in place after you’ve adjusted that corner of the table up or down (the lock screw.)
There is a maximum of about 3/8” adjustment per screw. To adjust a corner of the table up or down, Move the carriage (with the focus gauge in place) to the corner to be adjusted. Loosen the lock screw (the screw with the lock washer) to take the tension off of the table.
To raise the corner: Turn the adjustment screw in a clockwise direction until the table comes up and touches the focus gauge.
To lower the corner: Turn the adjustment screw counterclockwise until the focus gauge touches the table. After raising or lowering the corner of the table, tighten the lock screw.
- Adjust each corner as needed until the focus gauge touches the table at all four corners. NOTE: Turning the adjustment screws one full revolution will move the table 1/32” (0.8 mm).
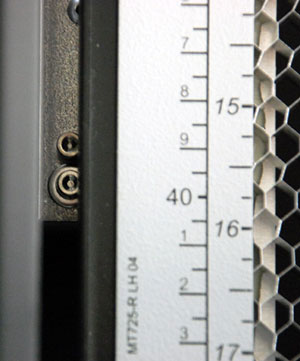
 Notice the two screws beside the ruler - the top is the adjustment screw, and the bottom is the lock screw.
Related Articles
Epilog - Mini, Helix Laser Alignment
CO2 laser alignment should be checked periodically to ensure the engraver is performing optimally. Download the Attached PDF for Detailed Instructions. Complete this procedure if any of the following behaviors are observed: Laser power appears weak ...Epilog - Fusion Maker - Fusion Edge - Fusion Pro 24 & 36 Alignment
CO2 laser alignment should be checked periodically to ensure the engraver is performing optimally. Download the Attached PDF for Detailed Instuctions. Complete this procedure if any of the following behaviors are observed: Laser power appears weak in ...Epilog - Fusion Pro 32 & 48 Leveling the Table
Download the Attached Document for Detailed Instructions: Table level should be checked periodically to ensure that all areas of the table are the same distance from the focusing lens. If all areas of the table are not the same distance from the ...Epilog - Fusion M2 Focus, Home, and Table Calibration
Download the Attachment for Detailed Instructions This document provides step-by-step instructions for calibrating the focus gauge, auto-focus, table home, x-y home, squaring of vector grid, and vector grid home for the Fusion M2 model Epilog laser ...Epilog - Zing 16 Laser Alignment
CO2 laser alignment should be checked periodically to ensure the engraver is performing optimally. Download the Attached PDF for Detailed Instructions. Complete this procedure if any of the following behaviors are observed: Laser power appears weak ...